Try swapping store-bought Lunchables for one of these easy keto Lunchable ideas! Not only are they healthier with no added sugars and minimal carbohydrates - but they can also be completely customized.
This Mom's Menu is a participant in the Amazon Services LLC Associates Program, an affiliate advertising program designed to provide a means for sites to earn advertising fees by advertising and linking to amazon.com. This post may be sponsored or contain affiliate links but all opinions are my own. I may earn money from purchases made through the links shared here (at no additional cost to you)
If your childhood was anything like mine, then you lived for the days when your mom made ZERO effort on your lunch, and you were blessed with a Lunchable!
In fact, my mom was a pastry chef at an upscale restaurant, and I remember many occasions where she would have a hot lunch delivered to me from the restaurant. But even still, nothing compared to the Lunchable days.
Jump to:
I grew up in the '80s and '90s, before the days of the fancy Lunchables with pizza and nachos and drinks. For me it was just crackers, cheese, lunch meat, and a teeny candy bar - but it was spectacular.
Now many moons later, my kids feel exactly the same about Lunchables as I did, although they have far more options than I did! I can't pass the Lunchable section of the grocery store without hearing begging and pleading to buy one.
Why you should make homemade Lunchables?
If you've never had the pleasure of eating a Lunchable, then let me spare you -- Not only are they are terrible, and WAY overpriced. They are pretty much every health-conscious parent's worst nightmare, full of overly processed junk.
I've been trying to figure out what the allure is, besides the super-easy factor. The only thing that I can figure out is that kids really enjoy the assembly aspect. They can control how much of an easy ingredient they want and they can eat it however they want.
These Homemade Lunchables mimic that aspect and some of my kid's favorite varieties - without all the processed junk.
You can completely customize them to suit your family's preferences, which is another reason that I am all for making my own. If creativity ain't your thing, have no fear ... I've spelled out my family's four favorite varieties to save you the brainpower 🙂
First up...
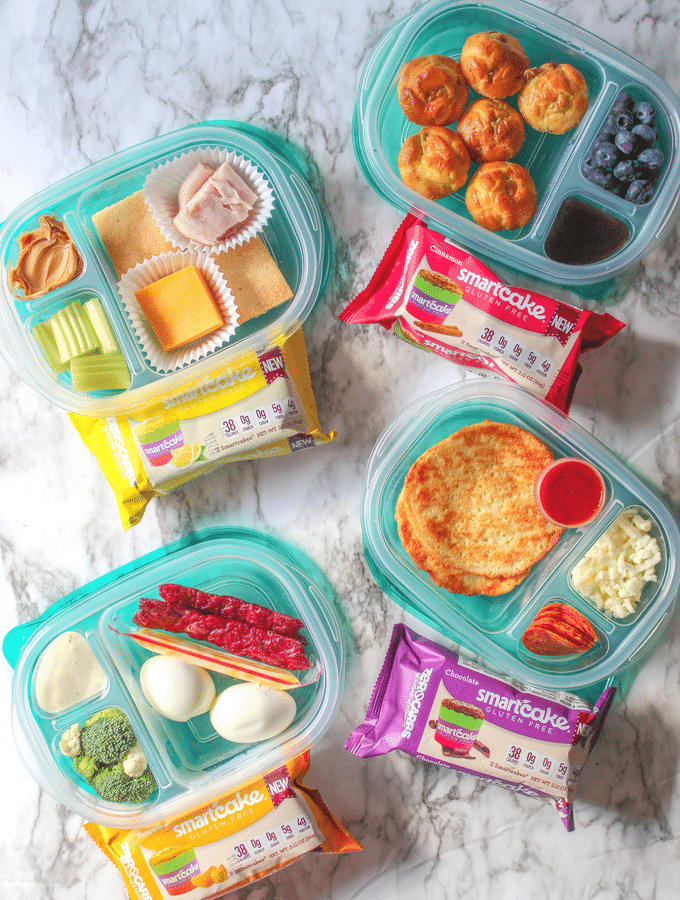
The Classic Keto Lunchable
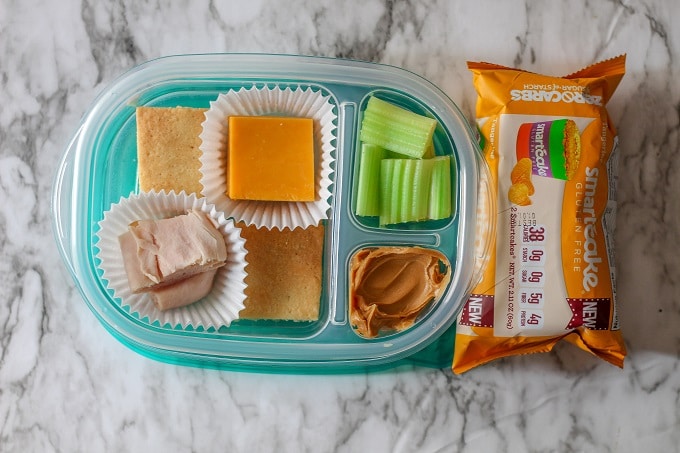
This is likely the most similar Lunchable of your childhood. It's the classic cracker, cheese, and meat combination with a few additions - because let's face it those tiny Lunchables never filled anyone up.
This keto Lunchable idea includes:
- Keto Butter Crackers - If you need a nut-free option, you could easily substitute the crackers for flax seed crackers or cheese crisps.
- Sliced Cheese and Lunchmeat - I used cheddar cheese and turkey, but you can use whatever you like.
- Celery and peanut butter - Use almond butter or sunbutter if you prefer.
- Smart cake dessert - because trust me when I say that you are going to be able to sell your kids on these healthier lunches MUCH easier if they include dessert!
Smart cakes are my family's favorite prepackaged, low-carb dessert.
The texture is seriously AMAZING - just like a real cake. They come in 5 flavors - Chocolate, Coconut, Lemon, Cinnamon, and Tangerine. Each Smart cake has only 38 calories, is gluten-free, sugar-free, and contains ZERO net carbs!
I don't know how they do it, but I am SOOOO glad that they do!
As a special offer just for my readers, you can get 10% off of your order of Smart Cakes when you use the code "thismomsmenu" at check out!
The Protein Packed Keto Lunchable

I know, I know, you've never seen a Lunchable like this in the store. But there should be, right?!?
This is probably the easiest of my homemade Lunchables to make because the only cooking is boiling eggs. You simply toss everything into a container and you are ready to go!
This protein Lunchable includes:
- Hard boiled eggs
- Jerky - These are jack links jerky strips, but we also LOVE Dukes sausages!
- A cheesestick - Any variety will work great!
- broccoli and cauliflower florets with ranch dip
- a smart cake
Pizza Lunchable

This one was a no-brainer. There has to be a pizza Lunchable, right?!? For this Lunchable you will need:
- 2 pizza crusts - I just used my go-to fathead dough recipe, to bake 2, 4-inch crusts. You could use any pizza crust you like, a low carb tortilla, or outer aisle sandwich thins!
- Shredded mozzarella
- Pepperoni
- Low carb marinara
- Smart Cakes
This Lunchable can be eaten cold, or you can microwave the assembled pizzas for about 30 seconds to melt the cheese.
TIP: For the marinara, I recommend using a small container with a twist-on lid versus a snap-on lid. I've found that little hands don't often get the snap-on lids sealed properly and this can result in a pretty yucky lunch. I used THESE (affiliate) cups which are super affordable! (The link is to Amazon, but they can also be purchased at Target!)
Breakfast for Lunch
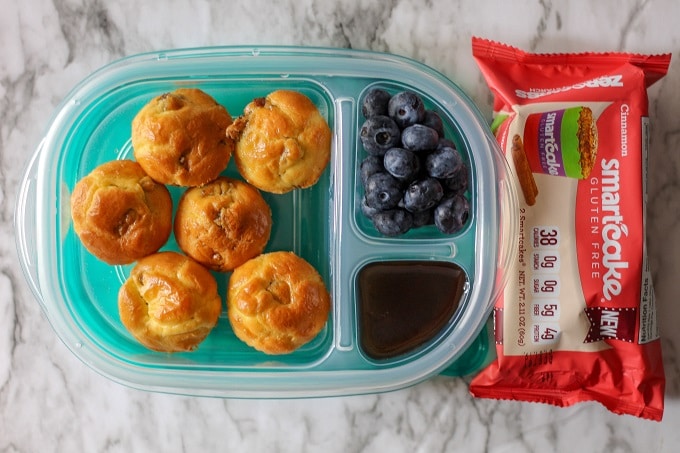
I have to admit that this is my personal favorite. I LOVE breakfast food, but usually don't eat it in the morning, so it feels like such a treat to have breakfast for lunch.
For the breakfast keto Lunchable you will need:
- Sausage Pancake Muffins made into mini-sized muffins (just use a mini muffin pan and reduce the baking time by about 4-5 minutes)
- Fresh blueberries or any berry that you like
- Sugar-free syrup.
- a Smart Cake
Not only are these great for lunch, but they can also be stored for grab-and-go breakfasts as well. The muffins can be eaten cold or microwaved for 30-45 seconds until warm.
Be sure to store the syrup in a separate container (like the one used for the marinara in the pizza Lunchable) if your container doesn't seal each compartment separately.
Best Lunchboxes and Accessories
- Insulated Lunchbox - We are obsessed with PackIt Lunchboxes (affiliate). The walls of the lunchbox are made of ice packs, so you just freeze the lunch box at night, then it keeps your food cold all day without having to worry about keeping track of a seperate ice pack.
- Divided containers - I used to buy expensive lunchbox containers, but inevitably my kids would lose or break them, plus I like having a weeks worth so that I can pack all the lunches on sunday. I now use cheap meal prep containers for kids (affiliate) and they work great and fit nicely inside most lunch boxes.
- Lidded Condiment cups - These (affiliate) are my absolute favorite. They hold just about 2 tablespoons and the lids twist on and seal really well.
- Contigo Water Bottles - These water bottles from Contigo (affiliate) are the best. They never leak and are easy for even my kindergartner to use by himself.
- Muffin liners -I use these to seperate food in large containers. I used paper liners in this post, but I suggest investing in silicone muffin liners since they are much sturderier and reusable.
You can find all of the products that I have mentioned in this post on my Amazon storefront.
No, as of now, there are no store-bought Lunchables that are completely keto-friendly. There are some varieties that can be easily modified to suit keto diets, but then you are left with a super small meal, which is why I highly suggest making your own!
There are so many great storebought keto desserts to pick from. Some of my favorites are Lily's chocolate bars and smart sweets gummies. Great homemade options include Soft keto chocolate chip cookies, keto Milano cookies, or fudgy keto brownies.
I hope that you will give some of these Lunch boxes a try! As I mentioned, feel free to customize them to suit your family's taste buds and budget.
These will all keep in the fridge for a week, so you can make them all on the weekend for quick grab-and-go options.
I can't wait to hear how you and your family like these Homemade Lunchables! Be sure to leave me a comment and let me know which ones you try and how it goes! Also, be sure to tag @thismomsmenu and hashtag #thismomsmenu on Instagram!
UPDATE: Be sure to check out my newest post with 10 more healthy lunch ideas!


txgrandma says
Very clever. Thanks for sharing!
Kelly G in ATX says
Thanks for sharing these ideas! My kids are excited about the cracker and sausage pancake muffin recipes. Since we've gone grain free/sugar free, they miss crackers a lot, and it's hard to find storebought ones that don't have a lot of carbs or spike their blood sugar :/ Looking forward to making these this week!
Sabra says
I hope that your kids like them! Those are my kiddos favorites too 🙂
Stephanie Bettis says
How long will these last in the refrigerator after made?
Nice thing about lunchables you can buy 2 weeks worth and they are done.
Sabra says
Hi Stephanie! These will easily last for a week. The sausage pancake muffins and the pizza crusts can be frozen for months which makes it really easy to throw together. Hope that helps!